Pulseway Integration
Pulseway is a Remote Monitoring and Management (RMM) solution designed for Managed Service Providers (MSPs) and IT administrators with the capability to proactively monitor and control servers, workstations, and other network devices from a centralized dashboard.
We have created a step-by-step guide to help you navigate through the integration process.
Configuring organization and adding devices
- Creating a Profile
- Go to Configuration > Profiles then click the New Folder. In the new folder’s name field enter Emsisoft Policy. Click the save button next to it.

- Once the folder is created, select it and then click on the New Profile.

- In the details page of the new profile, input the Name, Description, Policy Type and Configuration Type as shown in the screenshot below. Click Configuration or Next button to go to the profile Configuration.

- In the configuration page, select the Enable event log notifications tab and then click the Add Filter.

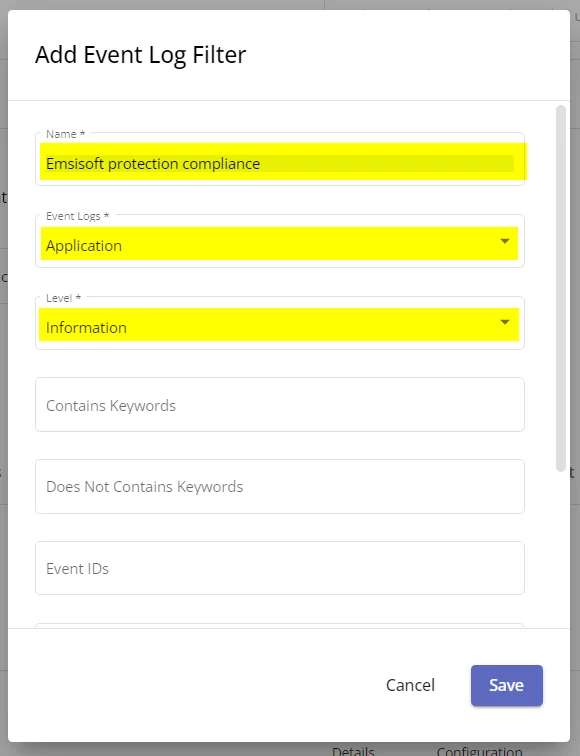
- Fill-in the Add Event Log Filter form with the data as shown in the screenshots below. Click the Save button once done.

- Click Create to create the new profile.

- Creating a Policy
- Go to Configuration > Policies then click on the Create New Policy button.

- In the Create New Policy details page, fill in the data as shown in the screenshot below. Click the Configuration button once done.

- In the policy’s Configuration page, click the Assign Profile.

- In the Assign Profiles form, select from the list the newly created Emsisoft protection compliance profile then click Assign.

- After assigning the profile click the Create button to create the new policy.

- Configuring an Organization
- Go to Configuration > Organization then click the Add button and select Organization.

- In the Add Organization form, input the name of the organization and the organization type. Click Add once done.

- Select the newly added organization then click the Edit button to update the organization details.

- Update the Monitoring Policy and set it to the newly created policy. Click the Save button once done.

- After updating the organization’s monitoring policy, click again the Add button but this time select Site.

- Input the site name then click the Add button to add the site.

- After adding the site, you can now add agent groups under it. You may do this by clicking again the Add button and selecting Agent Group or clicking directly the Add Agent Group.

- Enter the agent group name then click Add.

- After successfully creating the agent group, select it and on the left side tab select Downloads. Choose the OS that is relevant for the device that you will add.

- Once you are in the download agent installer form, you have two options to download the agent installer. You can choose to download it directly or copy the download link.

- After downloading and installing the agent on the target machine, the device will appear in Systems.

Preparing, uploading and deploying scripts
- Creating Scope
- First, we need to create a scope for our tasks that will execute our script. Go to Scopes under Systems and click Create Scope.

- In the New Scope page, enter the name and description of the scope. Check Windows checkbox for the System Type and then click the Edit Context button in the Context section to add scope context.

- In the Edit Context window, check the organization that we created then click the Confirm button.

- After selecting the context, click the Create button to create the scope.

- Preparing deployment script
- Download the integration scripts here.
- Open the downloaded zip file. It contains two scripts namely ps1 and Emsisoft_Setup.ps1. Save the unzipped files locally.
- In one of your Pulseway installed devices run Pulseway Manager. Go to Settings > Runtime In the PowerShell User Impersonation section, check PowerShell User Impersonation checkbox and enter your local admin credentials. Click the OK button once you are done.

- Run exe and go to HKEY_LOCAL_MACHINE\SOFTWARE\MMSOFT Design\PC Monitor. Copy the data of these three registry values namely PowerShellUserImpersonationPassword, PowerShellUserImpersonationPasswordCtrl and PowerShellUserImpersonationUsername.

- Open ps1 and edit the variables in the script with the user impersonation data above. Save the updated script file.

- Uploading Deployment Script and Creating Task
- Go to Automation > Script and create a new folder for our Emsisoft scripts. Click the New Folder button to do this. After creating the folder, select it then click the New Script.

- In the Create Script page enter the name of the script and the description.
Name = Set User Impersonation, Description = Set user impersonation

- Turn on the Enable switch in the Windows section and then copy-paste the contents of PulsewayUserImpersonation.ps1 script in the script box. Click Save once this is done.

- Repeat steps 1 to 2 for the ps1 script. Name = Deploy Emsisoft Compliance Script, Description = Deploy Emsisoft Compliance Script.

- Turn on the Enable switch in the Windows section and then copy / paste the contents of ps1 script in the script box. Click Save once this is done.

- Go to Automation > Tasks then click Create Task.

- In the Create Task page enter the name and description of the task. Set the Scope to the scope that we have previously created.

- Go to the Scripts page then select Emsisoft from the Categories Assign Set User Impersonation and Deploy Emsisoft Compliance Script scripts to this task in that specific order.

- After setting the necessary data for our task click the Save Task button to save this task.

- After you have created the task, it will now appear in your task list. You can hover on the task and click the run button on the right to execute it.

- The task’s execution status will now be seen as running. After the task has finished executing, you can view the result of the execution by clicking the view button.

- In the Task Details, go to Execution History tab and click on the latest result.

- In the Task Execution details page click on the Systems tab to view all system’s execution result. You can click on each system to view the result details.

- Uploading Setup Script and Creating Task
- Go to Automations > Custom Fields then click Create Custom Field.

- In the New Custom Field page, input the name and description of the field.

- Set the Global Value to any placeholder value and make the value read-only. You need to change this value to a real install token value when you run the task that uses the script where this custom field is used. Basically, this custom field is used in the setup script. Click the Create button to create the custom field.

- After creating the custom field, go to Automation > Script and select the Emsisoft folder then click the New Script.

- In the Create Script page enter the name of the script and the description as shown in the screenshot below. Click on the New button in the Inputs section to create an input variable.

- In the Add Variable form, enter the name of the variable and turn on the Use custom field value. In the Custom Field, select the field that we previously created. Click the Save Variable button once done.

- Turn on the Enable switch in the Windows section and then copy / paste the contents of ps1 script in the script box. Click Save once this is done.

- Go to Automation > Tasks then click Create Task.

- In the Create Task page enter the name and description of the task. Set the Scope to the scope that we have previously created.

- Go to the Scripts. Select Emsisoft from the Categories dropdown to see all available scripts. In the list, click the “+” button next to our setup script (Install Emsisoft Endpoint Protection) to add the script to the task.

- After setting the necessary data for our task click the Save Task button to save this task.

- After you have created the task, it will now appear in your task list. You can hover on the task and click on the run button on the right to execute it.

- The task’s execution status will now be seen as Running. After the task has finished executing, you can view the result of the execution by clicking the view button.
- In the Task Details, go to Execution History tab and click on the latest result.

- In the task’s Execution Details page click on the Systems tab to view all system’s execution result. You can click on each system to view the result details.
