How to Perform Manual PUP Removal

In the previous blog post in our Malware Removal series, we covered the basics of getting rid of malicious software. In this article, we want to take a closer look at one category of malware that is very common: potentially unwanted programs (or PUPs for short).
What is a potentially unwanted program?
Before taking a closer look at PUP removal, let’s first discuss what a PUP is (and what it’s not). Here at Emsisoft, we’re asked on a regular basis why we don’t detect application X, Y or Z as a PUP.
Let’s take, for example, browser helper objects, toolbars and PC Optimizers. None of these are inherently bad or unwanted. While we can debate the usefulness of such applications, they can only really be considered “unwanted” if they are distributed in a deceptive or unethical manner, or display fake or misleading information.
Going into all the details and differences would make this article unnecessarily long, but we will pay attention to this in our webinar dedicated to manual PUP removal. For details, please check the announcement at the bottom of this article.
Dealing with persistent PUPs
That brings us to the first step in the manual PUP removal process. Before doing anything else, locate any undesired application in the “Programs and Features” list and uninstall it. You can access this list in any version of Windows by pressing the Windows key and R simultaneously, which will open the Run box. In the Open field type appwiz.cpl and press enter. Of course, you should still research unknown entries to check if they are really unwanted and/or related to PUPs.
In some cases, however, annoying problems can persist even after uninstalling the unwanted application. While we could use the tools we used in our last article to fix the issue, when it comes to PUPs it’s usually more practical to take inventory of what exactly is affected. For example, if you see advertising pop-ups in your browser, you’ll need to focus on a different area than if you were to see those same pop-ups in your Windows system tray or notifications area. And in case of browser problems, you can quickly narrow down affected areas by first checking if all browsers have been affected or if the issue is contained to one particular browser.
To summarize, when dealing with PUPs:
- Before dealing with PUPs, check for real malware. That always has priority due to its impact (e.g. pop-ups ads might be annoying but password-stealing malware has the potential to do a lot more than just annoy us).
- Check the Programs and Features list and uninstall any unwanted programs. This may sound obvious, but you’d be surprised how many people omit this step.
- Categorize which problems are still remaining and what components are affected (e.g. browser, Windows notifications, searches, and so on).
- Narrow down the problem for each identified component.
Example of a classic PUP
Imagine the following scenario: you open a new tab in your favorite browser, but instead of it opening the page(s) you have specified in your browser preferences, it displays something else; and instead of searching using your specified search engine, something else is used. You try to modify the settings in the browser preferences but no matter what you do the problem persists.
There’s no further evidence of PUPs, but it’s clear that something fishy is still going on. Buckle up – it’s time for some manual PUP cleanup.
For our removal example, let’s stick with the above scenario. No malware to be found, no PUPs visibly installed and the browser preferences are looking okay. We will use two popular browsers, Google Chrome and Mozilla Firefox, to show what the next steps would be. We won’t be using any special tools – the only things we need are good online research skills and a bit of patience.
Removing Newtab
In the image below, you can see that the browser is supposed to load the Emsisoft website once a new tab is opened. However, this doesn’t happen. Something called “Newtab” has loaded instead. Even though Newtab in our example is not malicious, this is still is considered a form of browser hijacking.

If we do an online search for “Newtab” we find a bunch of removal guides, but most of these appear to be a mix of running automated tools without really mentioning manual removal.
Let’s also have a look at the search settings (note, this time Firefox is used, but Chrome will show something similar). Here we notice something interesting, the browser is telling us an extension is managing the search engine.
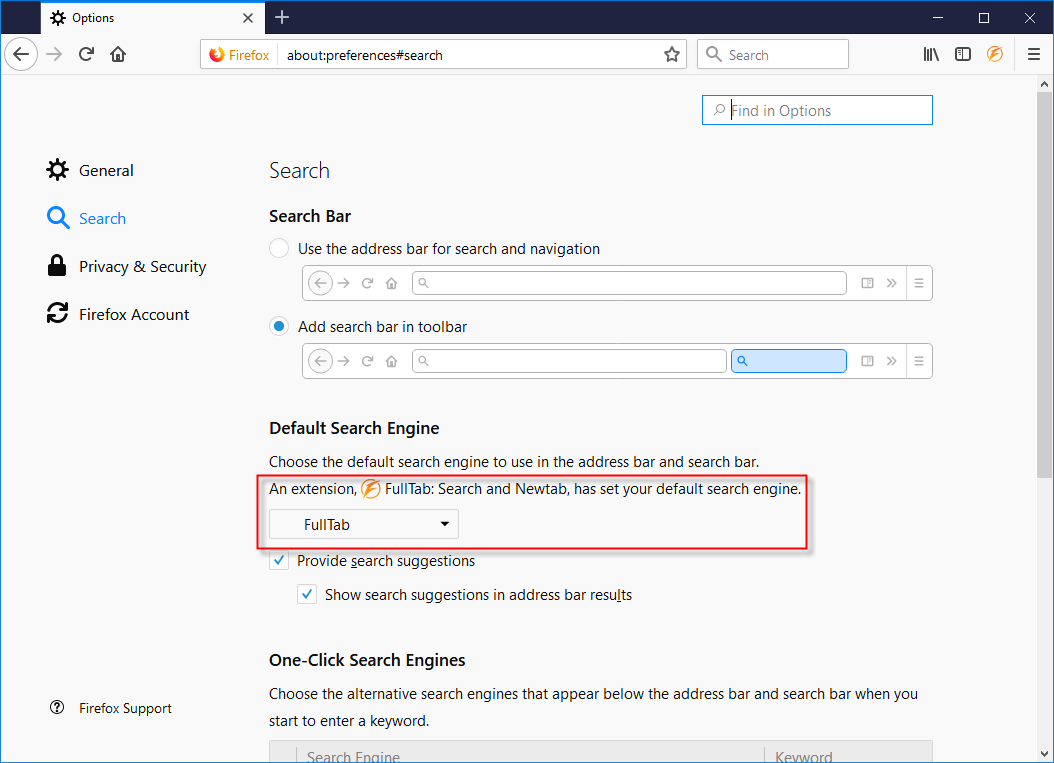
Of course, we could just change the search setting, but apparently there is also an extension involved, which means we will have to get rid of that as well. Most browsers have an extensions list where you can manage extensions, but some extensions use mechanisms to persist or hide. For this reason, it is a good idea to find out exactly how the browser manages extensions and where it stores extensions and related settings (note, we use two browsers in this example, but this information should be available for most browsers).
Where are the extensions hiding?
Both Mozilla Firefox and Google Chrome have robust documentation for developers that explains various ways extensions can be loaded (it’s available for everyone via a quick search — an important skill here). In this instance, we’re able to find the following for each browser:
After reading the above articles, to summarize, for Chrome we’d need to check:
- %LOCALAPPDATA%\Google\Chrome\User Data\Default\Extensions\<extension ID> (Each extension has an assigned 32-character extension ID)
- HKEY_LOCAL_MACHINE\SOFTWARE\Google\Chrome\Extensions\<extension ID>
- HKEY_LOCAL_MACHINE\SOFTWARE\Wow6432Node\Google\Chrome\Extensions\<extension ID> (for 32 bit browsers on 64 bit Windows versions)
And for Firefox:
- %APPDATA%\Mozilla\Firefox\Profiles\<profile folder>\extensions\{<extension ID>}.xpi
- %APPDATA%\Mozilla\Extensions\{<extension ID>}.xpi
- HKEY_CURRENT_USER\Software\Mozilla\Firefox\Extensions
- HKEY_LOCAL_MACHINE\SOFTWARE\Mozilla\Firefox\Extensions
Note: %APPDATA% refers to the C:\Users\<username>\Appdata\Roaming folder, %LOCALAPPDATA% refers to the C:\Users\<username>\Appdata\Local folder. “Default” is the name of the first registered Chrome profile, additional profiles will have a different folder name.
Now that we have a list of all locations an unwanted extension could be hiding in, let’s see if we can find and remove it. In order to do that, we need to know what the extension ID is (note, this will be different for each browser).
In Google Chrome, type chrome://extensions in the address bar and press enter. You will now see a list of installed extensions. Every entry will have a Details button which, when clicked, will show the extension ID in the address bar.
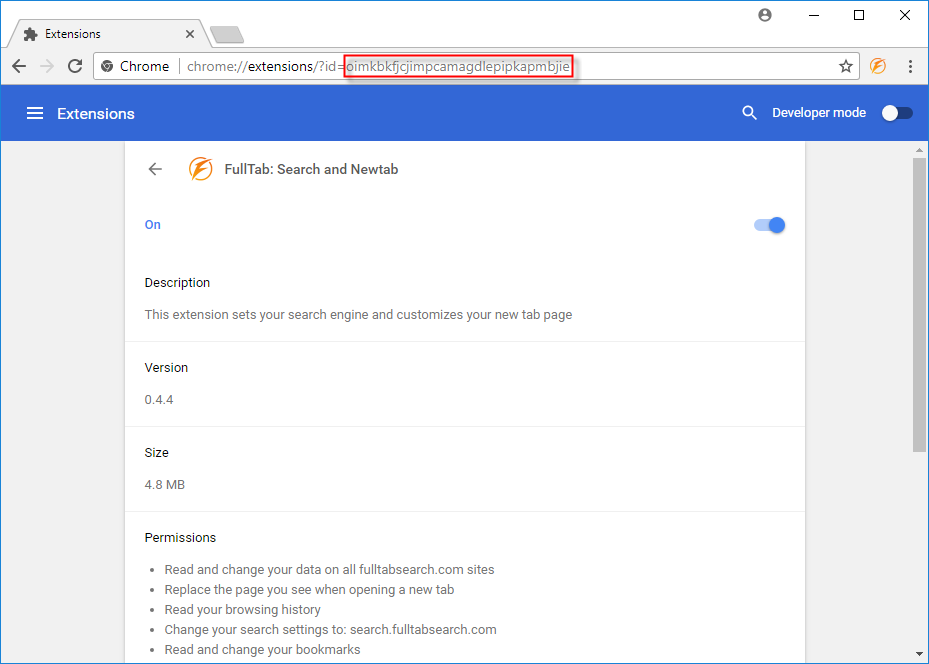
Be sure to pay attention to the permissions listed for this extension, as they match the problems described earlier (change search settings, change new tab).
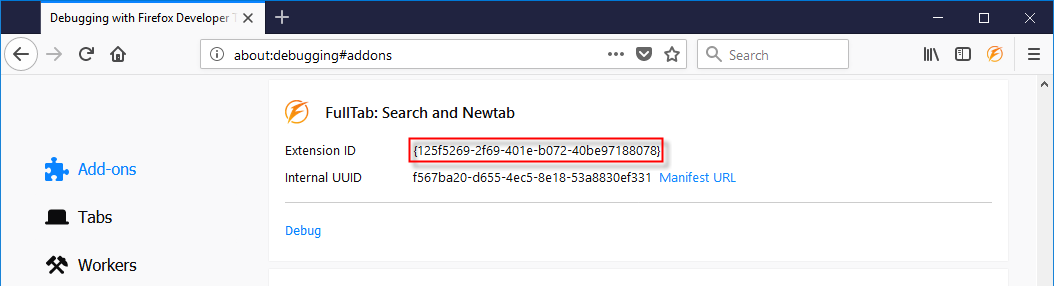
In Mozilla Firefox, type about:debugging#addons in the address bar and press enter. You will find the extension we are looking for in the list.
To summarize, right now we’re looking for the following objects:
- Oimkbkfjcjimpcamagdlepipkapmbjie in any of the locations we identified earlier for Google Chrome extensions.
- {125f5269-2f69-401e-b072-40be97188078} in any of the locations we identified earlier for Firefox extensions.
In this case, the extensions are present in the following locations:

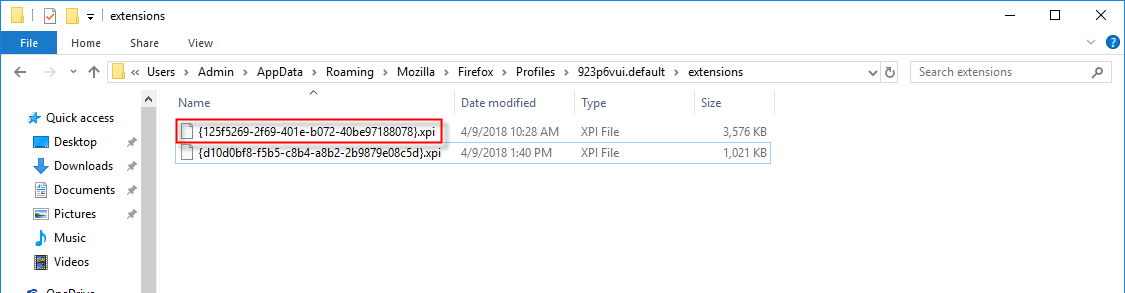
These objects can easily be deleted. However, we’re not done yet because both Firefox and Google Chrome also use a preferences file which will usually contain references to installed extensions. Note that it is always good practice to keep a backup of any items you remove (in case you make a mistake along the way).
Cleaning up the references
Technically, in this case not much will happen if the browser references to the identified extensions are not removed, but it is good practice to clean them up as well.
For Google Chrome, preferences are saved in %LOCALAPPDATA%\Google\Chrome\User Data\Default\Preferences (this is a text file using JSON markup).
For Mozilla Firefox, preferences are saved in %APPDATA%\Mozilla\Firefox\Profiles\<profile folder>\Prefs.js
While you can open both files using a text editor, removing references this way is a bit risky. With this method, you need to ensure you maintain the correct formatting, as making a mistake could result in a corrupt browser profile. Thankfully, we do have a few other options (aside from just ignoring the remnants or resetting the browser settings to default).
Firefox
Firefox has a very convenient option that displays the Prefs.js variables and application settings in the browser where they can be modified (to open this, type about:config in the address bar and press enter). In this case, let’s do a search for the extension ID. The result is as follows:
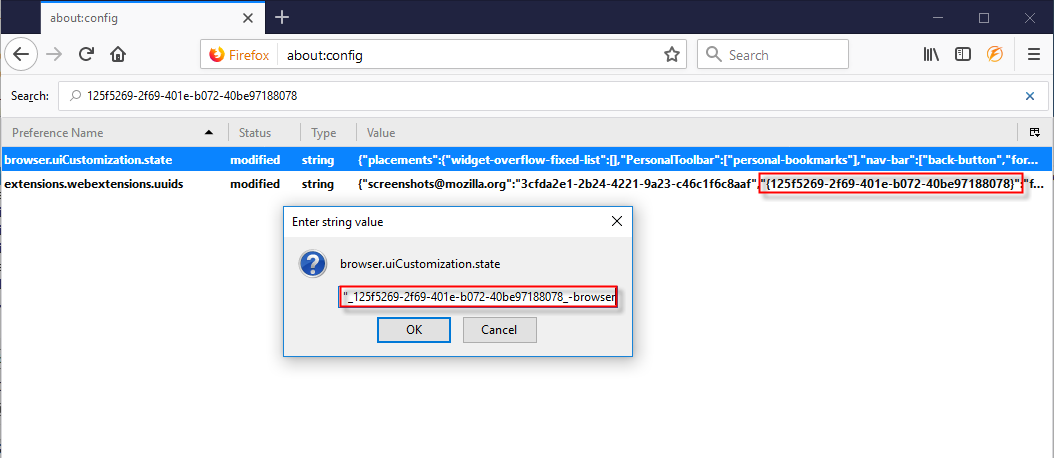
As you can see, the extension ID is present in two variables. We have two options here: either we can edit the variable’s data (by right clicking it and selecting Edit as seen in the image above); or we can simply reset the variable (this can be done by right clicking the variable and selecting Reset). The second option is the safest, but the first can be more practical if the browser is using a lot of extensions or UI customizations, because the entire variable will be reset containing all data (note that the correct variable data syntax will need to be used).
Chrome
Chrome does not have a config option, so here we’ll just have to adjust the affected settings manually using the chrome://settings and chrome://extensions options (in this case you can still find remnants under Extensions). To ensure you’ve found and removed all traces of the extension, you can open the Preferences file in a text editor afterwards and do a Find (CTRL + F) for the extension ID. If all is well, you should see the following (Notepad is used here. For your own convenience, it’s recommended to use a more versatile text editor):
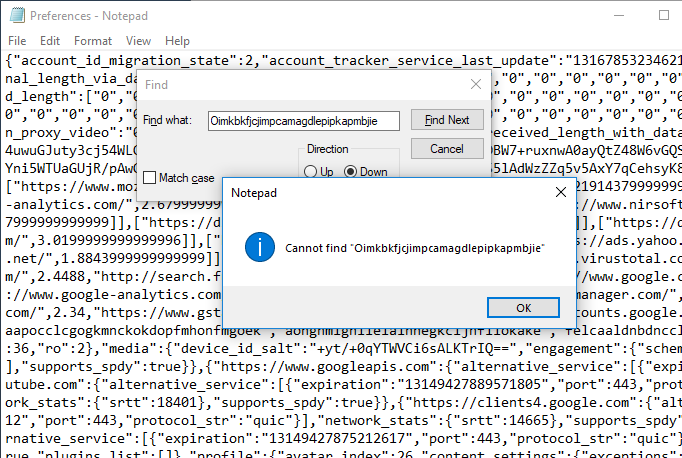
As you can see, all references are now gone (if there is still one there, check in which variable data it is present and research that online to see how you can modify it if you don’t want to edit the Preferences file directly). You can do this same check for Firefox’s Prefs.js file as well.
Note: Always be careful when directly editing preference files. Before making any modification, save a copy of the original file in a safe location as backup.
Applying the knowledge to other PUPs
This is just one example of how a PUP component can be removed manually without using special tools. While tools can definitely make your task a lot easier, it is always a good idea to understand the underlying mechanics (to stick with our example: a logging tool can show us a bunch of browser settings, but where exactly does it find those?). Initially, it will be a bit more time-consuming because there is some research to be done, but once you learn how a browser manages extensions, you have that data ready-to-use next time. Using this same principle you can also address other commonly used PUP components like Windows tasks, shortcut hijacking or browser policy modifications.
On-Demand: Manual PUP Removal

If you have any questions that you’d like Elise to address during the webinar, please leave them in a comment below, or you can ask them during the webinar as well.
Disclaimer: This article and the webinar are for demonstration purposes only. There are multitudes of PUP variants in existence and many need a different approach for removal compared to the method presented here, depending on their purpose. We’re aware there are exceptions to every rule and that things aren’t always this straightforward. However, covering all of those exceptions would not serve the purpose of this blog post. If you need assistance in removing malware from your computer, feel free to download our Emsisoft Emergency Kit and reach out directly to our Malware Analysts at [email protected].
Emsisoft Enterprise Security + EDR
Robust and proven endpoint security solution for organizations of all sizes. Start free trialHave a great (malware-free) day!


